 I’ve already added a recipe for ginger cake further down which was super tasty, but to be honest it wasn’t the one I wanted to use. It was very nice though…
I was given this particular recipe many years ago back in the 80’s when I worked nights as a nurse.. We often used to chat and swap knitting patterns and recipes and this recipe was given to me by an older nurse who made it for her family on a regular basis. I jotted it down on a bit of paper at the time and after making it several times ended up mislaying it for years.
Imagine my joy when I found it the other day tucked away behind the flap of one of my very old cook books.
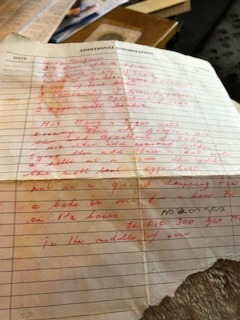
It was very old and battered, but I was able to just make out the writing, as you can see, it was quite indistinct, but I managed..
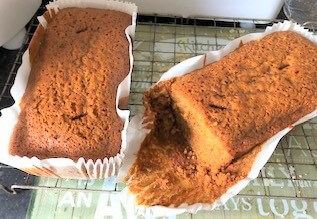
I decided to give it a go the other day as hubs loves ginger cake and it was as good as I remembered. The cake was incredibly moist, with that lovely sticky consistancy only ginger cake can have. It also kept for nearly a week in an airtight container..
Ingredients
4 oz margarine or butter. (if you’re a purist, use butter, but I used a good baking margarine and it was excellent and a lot cheaper).
2 1/2 cups of self raising flour. You can buy the weighing cups from home bargains or amazon etc. now. I had no idea 30 plus years ago what a cup measurement was, I think I used a teacup which seemed to work ok if I remember rightly..
2 thirds of a cup of sugar
1 cup of golden syrup (warmed up)
1 cup of hot water
2 teaspoons of ground ginger. (We like it very gingery so I also added some pureed ginger that I had in).
1 teaspoon of bicarbonate of soda
2 well beaten eggs
Method
Mix the marge and suger together until it’s light and fluffy, then add ginger and mix well with the bicarb of soda.
Add the warmed syrup,
Add the flour and the hot water a little at a time mixing it in very well.
Add your beaten egg and continue to stir well. Make sure you don’t have any flour lumps etc.
Put it into a very well greased tin. As you can see, I like to use paper cases. You can get them from home bargains or Amazon and they are really inexpensive. They also save a load on washing up.
Bake in the oven for just over an hour, then test with a skewer or knife. (I use a clean knife). If it comes out clean, then it’s cooked. if you have cake mixture on it then it will need longer. (I’d check it every 10 mins or so after that first test). Another way you can check it’s cooked is if the mixture has shrunk away from the sides of the tin. If your oven is electric and fan assisted try it on about 145, if not, cook on 150. I think that is gas mark 2, but I’d look it up first..
Leave it on a cooling rack then enjoy. If you can, leave it until the next day as it’s a lot more sticky and moist. Keep it in an airtight container and it will last for ages..