 Jam roly poly really takes me back to my childhood. It’s one of those recipes that (I think anyway), are timeless.
My mum would make a suet jam roly pudding with lashings of custard. It was a really easy cheap way to fill us kids up. I used to make it regularly when my daughter was a child in the colder weather, Both she and my husband loved it.
I’ve not made it for a while, but decided to have a bash when I was scrolling through some recipe sites.
Jam roly poly isn’t known for being ‘light’ in fact it’s incredibly stodgy, which makes it perfect for those long cold miserable days when you want to eat comfort food.
To be honest, this pudding I made didn’t turn out fabulously pretty, (It’s darned hard to roll suet pastry), but it sure did taste good.
Ingredients
- 50g margarine or unsalted butter. Make sure it’s cold and cut into chunks, plus you’ll need a tad extra for greasing
- 250g self raising flour, plus extra for rolling
- half a teaspoon of vanilla flavouring (Optional)
- 50g shredded vegetable suet. (You can use beef suet if that’s what you have in)
- 150-160 ml milk (Don’t make it too wet)
- Approx. 100gms jam in whatever flavour you prefer (I used strawberry)
- sugar to spread on the top
- Tin foil
- Greaseproof paper
- Baking tray
- Lashings of custard, to serve with it.
 Method
-
Pre-heat your oven to 180°c (160°c for fan assisted ovens or Gas Mark 4). You can place e a roasting tin with boiling water at the bottom of your oven if you wish, (I read that online). Apparently this create steam in the oven to help make the Jam Roly Poly a tad softer. I don’t bother, though I might give it a try next time I make one.
- Put the suet, flour and vanilla into a mixing bowl. Once well mixed, fold the suet into the mixture until well mixed. Pour the milk in and work it gently with a fork, until you get a sticky dough. You may need a drop more milk, depending on your flour., don’t make it too sticky though.
![]()
- Once mixed, turn your dough onto a well floured clean surface. Make sure you’ve got plenty of room to roll.
- Now you need to ‘shape’ the dough. Use a well floured rolling pin to shape it into an oblong shape approx 25cm by 25cm. However you may find it’s too sticky to use a rolling pin, if so, then use the heels of your floured hands to shape it
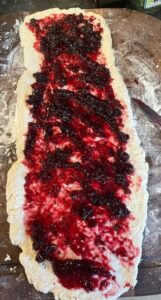
- Once in a rough oblong shape, spread your jam all over. Make sure you leave a gap on one edge and at one end. You could trim the edges now if you want it to be really straight. (I didn’t).

-
Spread the jam over the dough, leaving a 1-2cm gap on one edge.
-
To roll your Jam Roly Poly, take the edge opposite the gap you made and start to roll towards it. To be honest, it will probably be more of a fold than a roll as you start. Be careful you don’t overstretch the dough and ensure your hands are well floured so the dough doesn’t become too sticky.
- Roll carefully until you reach the other end of your dough.
- Once you’ve rolled up to the end, brush the end of the dough with some milk then finish rolling to seal it up.
- Once rolled, brush the top of the roly poly with some milk and sprinkle with a spoonful of sugar.
- Lay the greaseproof paper on the baking tray then carefully lift the roly poly onto it. I usually use two spatula’s to do this. Alternatively you could roll the dough whilst on the greaseproof paper so you don’t have to lift it in.
-
Bring your prepared tin foil to the rolled Roly Poly. Pull the greaseproof paper and tin foil around the Roly Poly and fold together to seal the edges. You need to create a sealed parcel around the Roly Poly. Make sure you leave lots of space around it on the inside to ensure it can rise whilst it bakes.
-
Bake in the pre-heated oven for 50 minutes to 60 minutes.
-
Once baked, remove from the oven and open it up to let the steam out.
-
Let it cool a tad before serving otherwise the jam may burn your mouth.
And that’s my take on jam roly poly, I hope you enjoy it…


